AI-Managed Documentation That Lives in Your Codebase
One approach I’ve found works well for internal documentation: embed it as markdown files directly in the codebase, render it inside the application itself, and let Claude maintain the content.
This turns documentation into a first-class part of the system — versioned with git, reviewed in PRs, and visible to users without leaving the app.
Overview
- Documentation as code — markdown files live in the repo, rendered inside the app
- AI-maintained — Claude writes and updates articles based on actual source code
- Timeless content — focus on concepts and architecture, not step-by-step procedures
- Embedded diagrams — Mermaid produces version-controlled, AI-editable diagrams
- Automated screenshots — MCP tools capture real UI screenshots for documentation
Embed Documentation in Your App
Rather than hosting docs externally, store them as markdown files in your codebase and serve them inside the application. A build script generates a manifest at compile time, and the app renders the articles with a markdown component.
The structure is straightforward:
packages/shared/src/documentation/
  index.md
  architecture.md
  core-concepts.md
  fetch-workflow.md
  images/
    hierarchy-view.png
    multi-phase-dialog.png
A build script parses the frontmatter (title, order) from each .md file, reads the content, and generates a TypeScript manifest:
// Auto-generated at build time
export const DOCUMENTATION_MANIFEST = [
  {
    slug: "architecture",
    title: "Architecture",
    order: 1,
    content: "# Architecture\n\nBuildIQ runs on AWS as a set of..."
  },
  // ...
];
The app imports the manifest and renders articles with react-markdown. A custom component map handles headings, tables, code blocks, links between articles, and image URL rewriting — all in one shared component.
This gives you documentation that:
- Ships with the app — always matches the deployed version
- Lives in git — diffs, blame, PR review all work naturally
- Requires no external service — no Confluence/Notion account or sync tooling
Fix the UX, Not the Docs
If a feature needs a paragraph of documentation to explain how to use it, that’s a UX problem. Fix it with better labels, defaults, and validation — don’t paper over it with a guide. Documentation that restates what’s already on screen becomes outdated the moment the UI changes.
Good documentation covers concepts instead — the mental models that help users understand why things work the way they do. For example, rather than documenting “how to create a three-phase sensor” step by step, write about what phase values mean, how automatic phase totals work, and when you’d use each approach. Conceptual content like this rarely needs updating, while step-by-step UI walkthroughs break with every redesign.
Documentation Callouts
A nice bridge between the two is an info callout embedded in the UI that links to the relevant documentation article. For example, an integration setup page can include a card like “Need help setting up SolarAnalytics? Learn about configuration, authentication, and available data points” with a link to the docs. The callout doesn’t explain how to fill in the form — it points to broader context that helps the user understand the integration.
Let Claude Maintain It
Since the documentation lives in the same repo as the code, Claude can check its writing against the actual implementation — tracing through handlers, helpers, entities, and UI components to produce articles that reflect how the system actually works.
A couple of tips that help get good results:
- Describe concepts, not click paths. Claude is good at explaining architecture and data flow. Step-by-step UI walkthroughs (“click this button, then that menu”) break next month.
- Ask for diagrams. When Claude writes about a workflow or data flow, ask it to include a Mermaid diagram (see below). The visual often communicates better than prose alone.
Diagrams with Mermaid
Mermaid is a text-based diagramming syntax that renders to SVG. It’s a strong fit for AI-maintained documentation because the diagrams are just text — Claude can read, write, and update them as easily as prose.
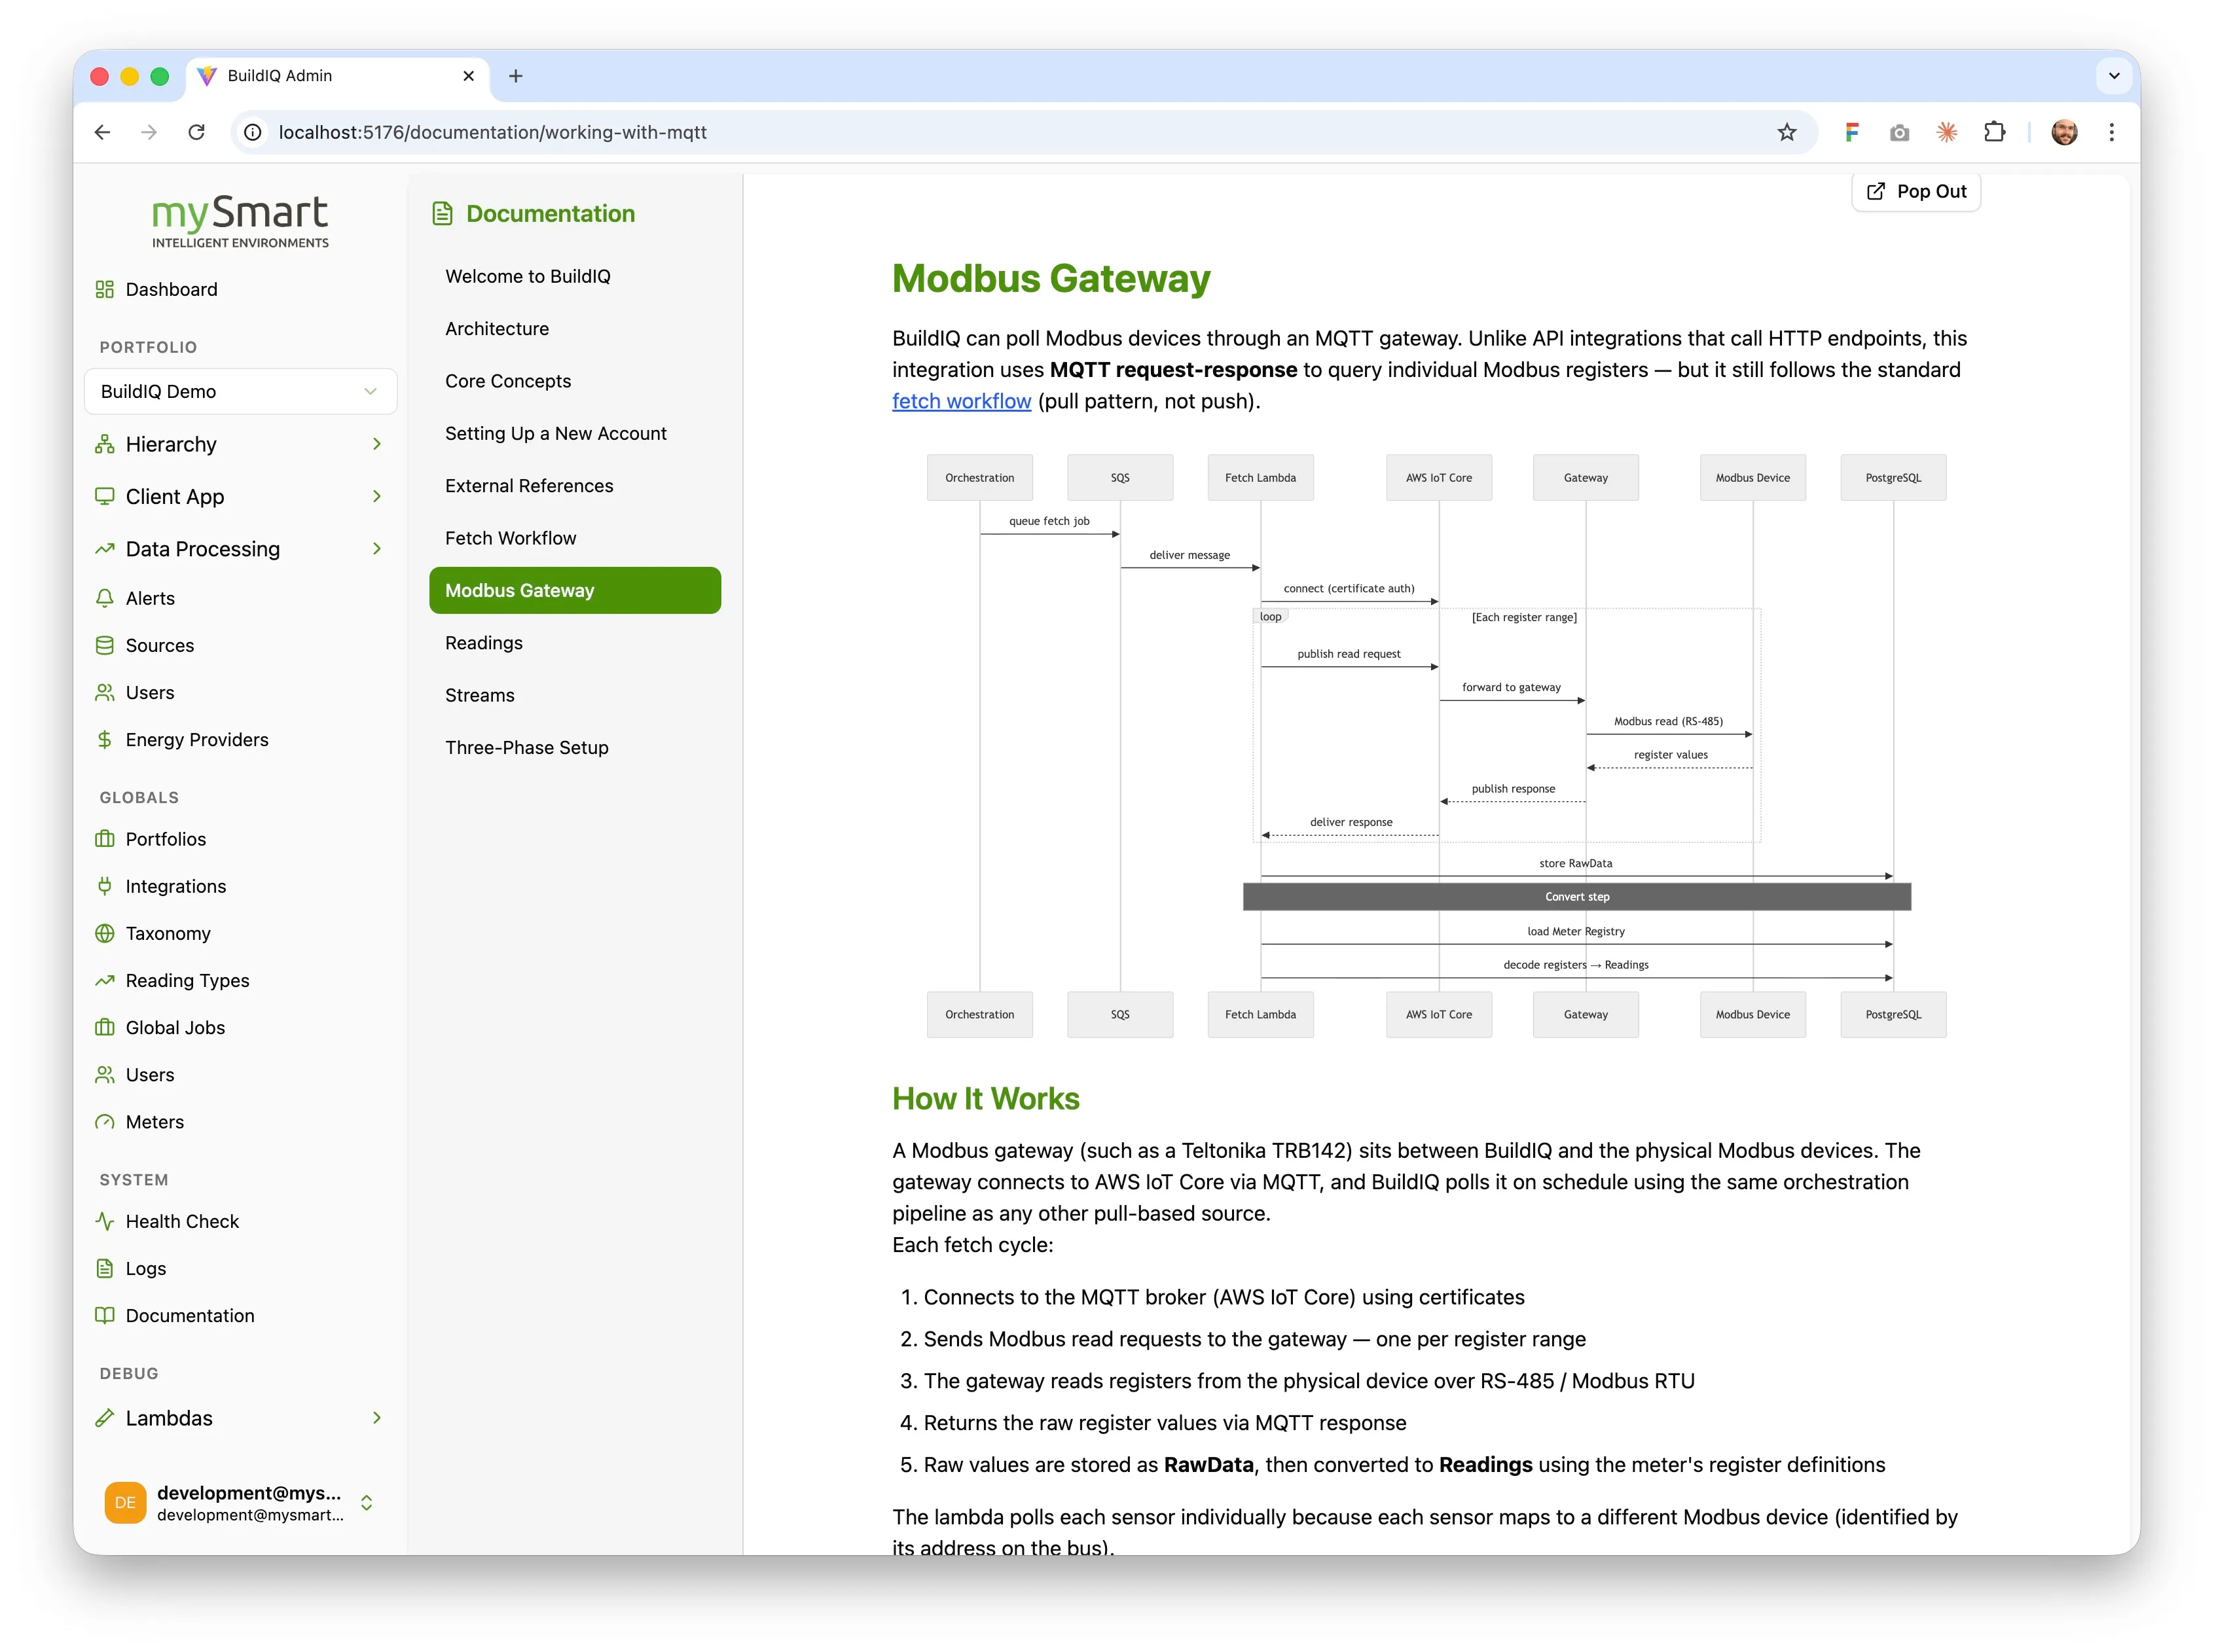
A fetch workflow diagram looks like this in the markdown source:
```mermaid
sequenceDiagram
  participant EB as EventBridge
  participant OL as Orchestration
  participant SQS
  participant FL as Fetch Lambda
  participant API as External API
  participant DB as PostgreSQL

  EB->>OL: trigger (every 1 min)
  OL->>DB: find sources due to fetch
  OL->>SQS: queue message
  SQS->>FL: deliver message
  FL->>API: fetch data
  FL->>DB: store RawData + create Readings
```
Which renders to:
The rendering side is simple. In your markdown component, detect code blocks with language-mermaid and render them with the mermaid library instead of as code:
code: ({ className, children, ...props }) => {
  if (className === "language-mermaid") {
    return <MermaidDiagram chart={String(children)} />;
  }
  // ... render normal code blocks
}
The MermaidDiagram component calls mermaid.render() and injects the resulting SVG. Since mermaid rendering is asynchronous, the component handles its own loading state and shows the raw source as a fallback on error.
Compared to image-based diagrams, mermaid source text is:
- Diffable — changes show up clearly in PRs
- AI-editable — Claude can modify diagrams as part of a documentation update
- Consistent — all diagrams share the same visual style automatically
- Searchable — diagram content appears in grep/search results
Screenshots via MCP
Some things are better shown as actual screenshots — UI dialogs, data views, configuration panels. Rather than capturing these manually (and forgetting to update them), you can use Puppeteer MCP to let Claude capture screenshots directly from the running application.
The flow:
- Claude navigates to the relevant page using Puppeteer’s MCP tools
- Authenticates using test credentials (stored in the e2e test config)
- Navigates through the UI to reach the target view
- Captures a screenshot and saves it to the documentation images directory
- Adds the image reference to the markdown article
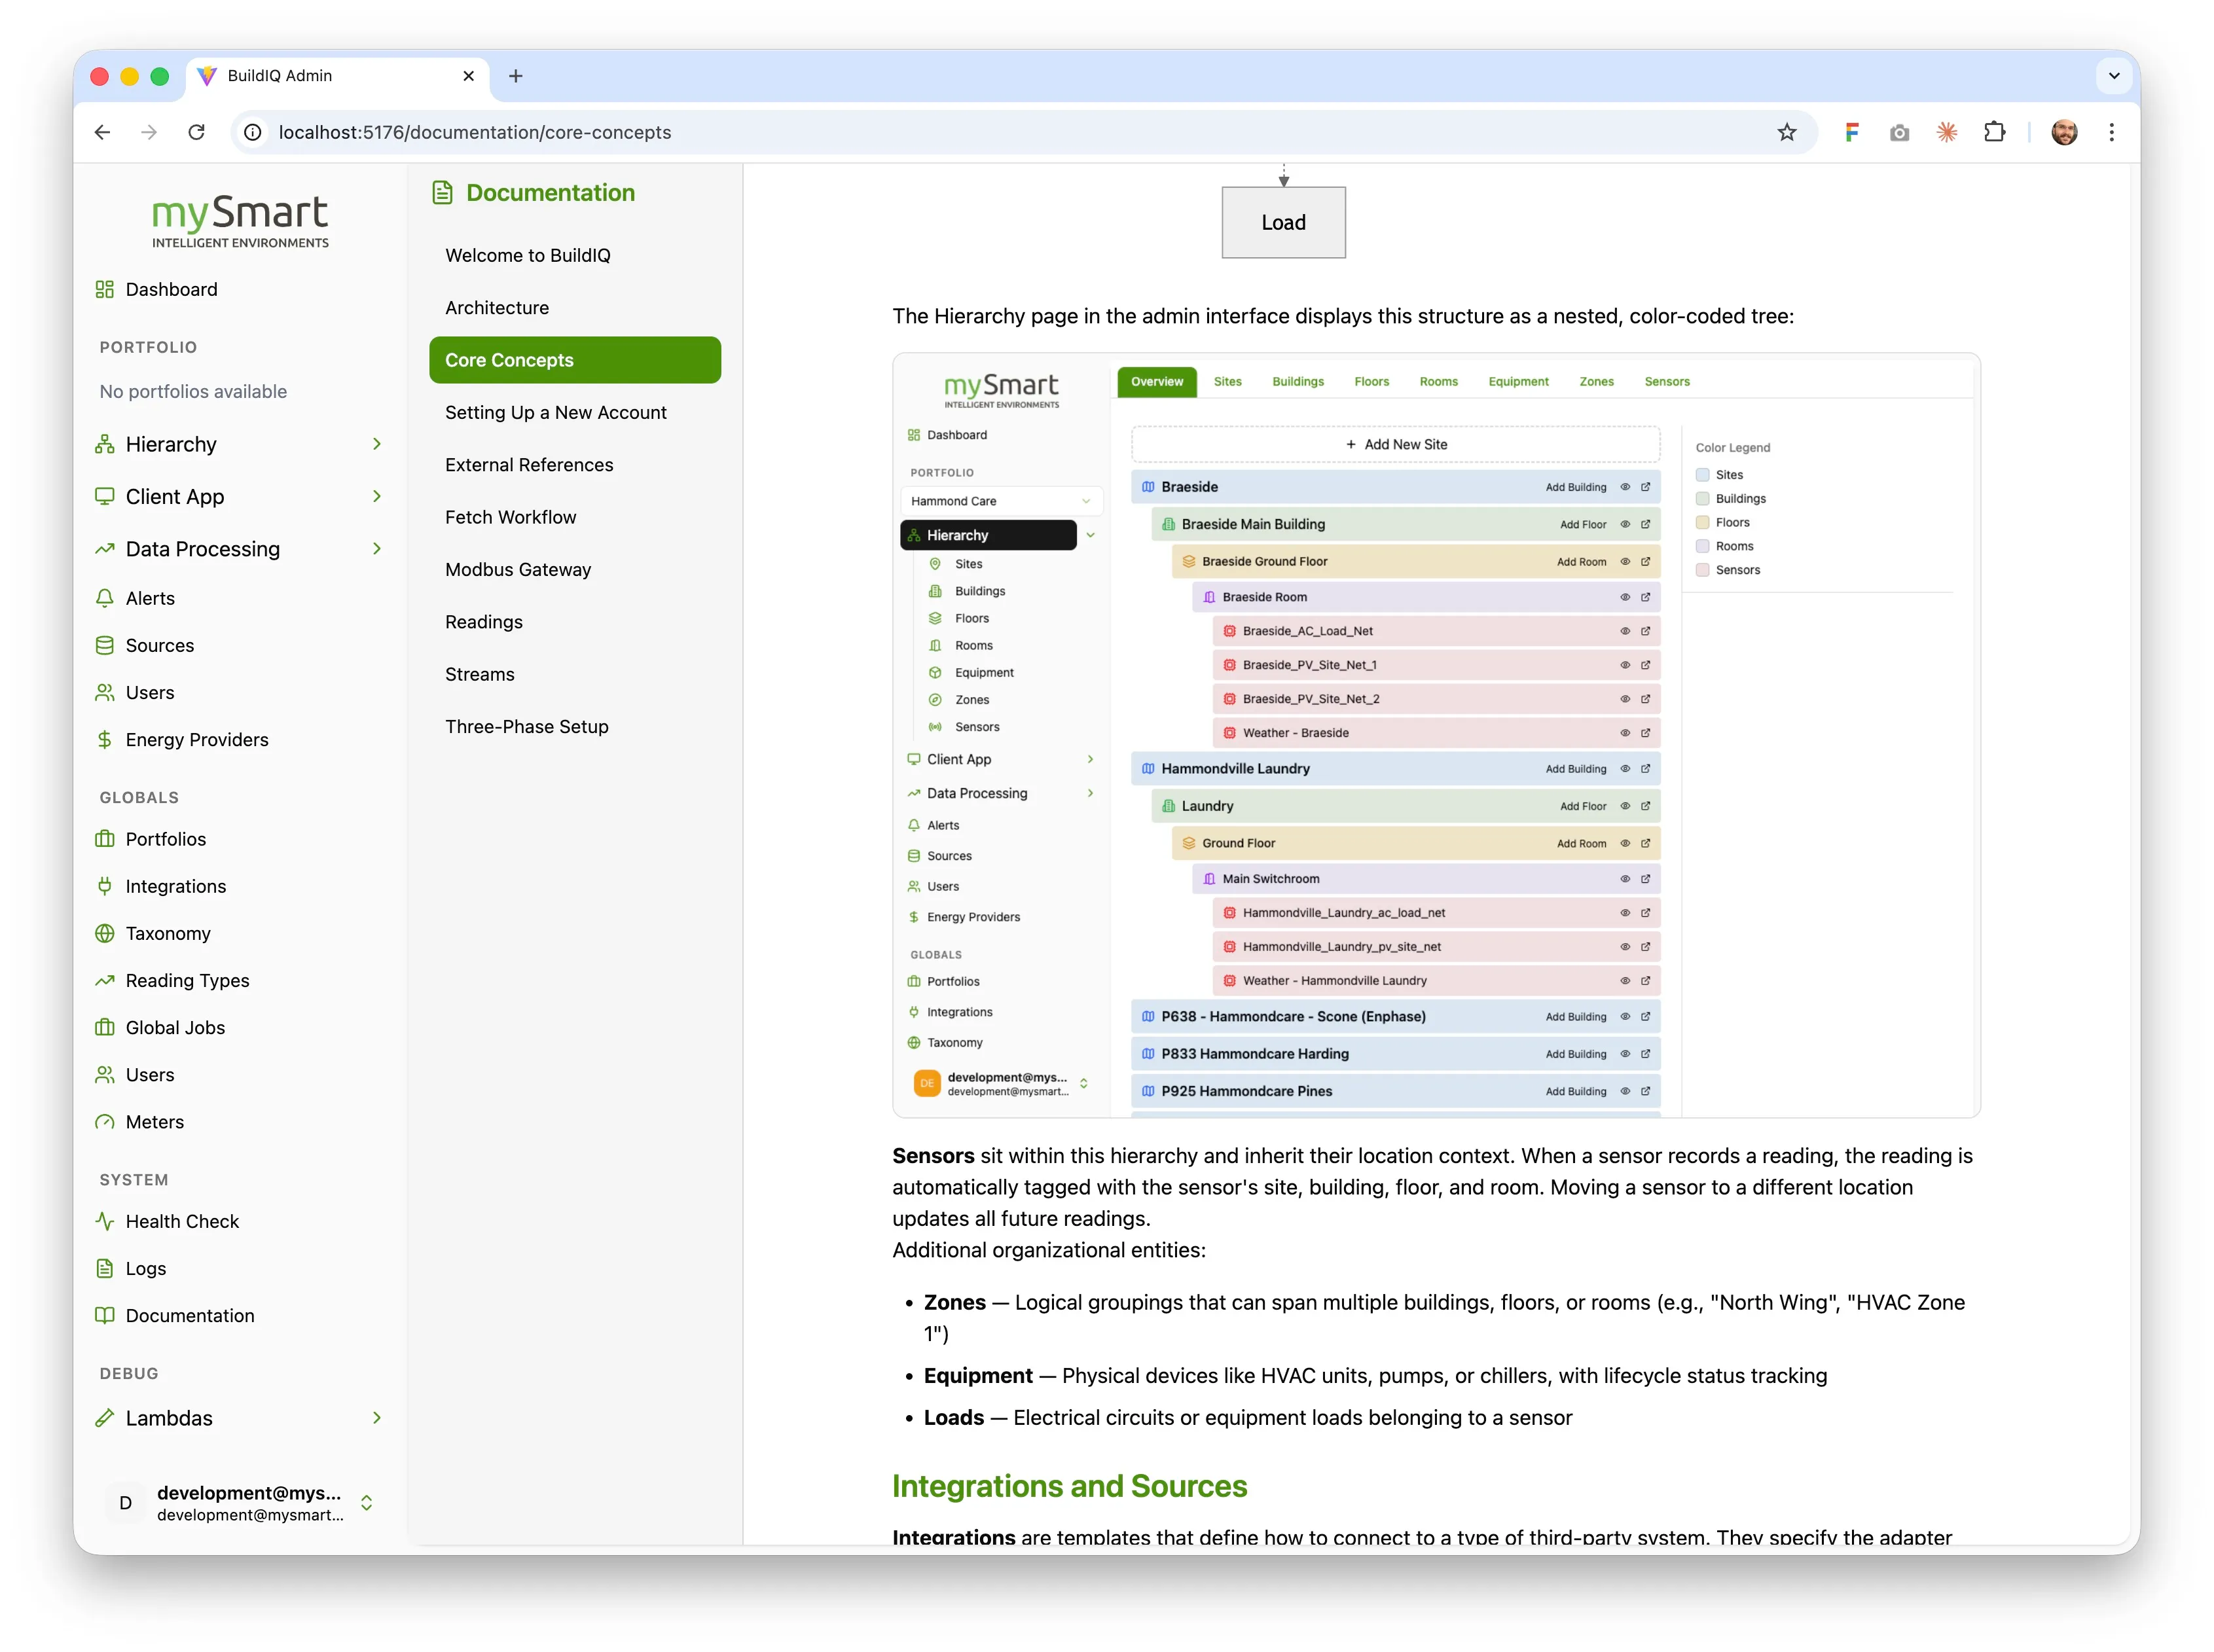
For example, to capture the data hierarchy view, Claude logs into the admin app, selects a portfolio with data, navigates to the hierarchy page, and takes a screenshot. The image is saved alongside the markdown files and served through an API endpoint.
The images directory is copied to the build output by the documentation build script, and a simple API endpoint serves them:
@Get('images/:filename')
getImage(@Param('filename') filename: string) {
  const { path, contentType } = this.documentationService.getImage(filename);
  return new StreamableFile(createReadStream(path), { type: contentType });
}
The markdown component rewrites relative image paths (images/foo.png) to absolute API URLs so they load correctly in the rendered article.
This approach means screenshots can be recaptured whenever the UI changes — ask Claude to “update the screenshots in the documentation” and it navigates to each location and recaptures via MCP.
This setup won’t replace API references, onboarding guides, or customer-facing docs. But for internal system documentation that explains how things work, it holds up well.